Welcome
to our Stamp of the Month Blog Hop! We
will be featuring our popular Brushed paper packet special.
If you came here from Gina's blog you are on the right path! The blog hop is a great big circle, so you can start here and work your way all around. If you get lost along the way, you'll find the complete list of participating consultants on 
This month we have 18 CTMH consultants sharing their creations using the CTMH Bring Back My Pack—Brushed special with other great CTMH products on their blogs. This is simple to do - just click on the link at the end of the post on each blog to move to the next one!
Here we go!
Here we go!
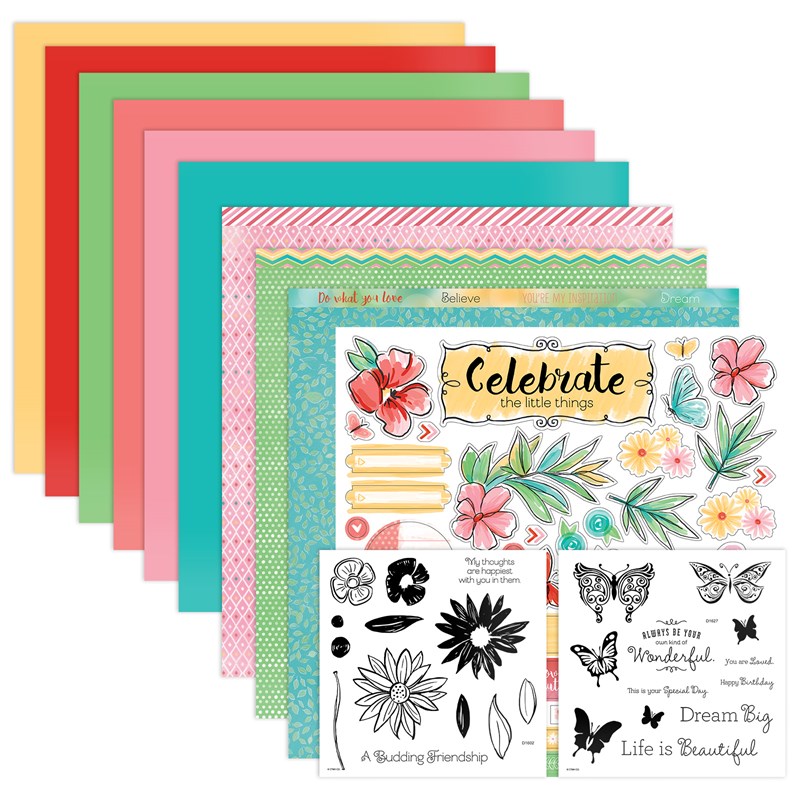
We have slimmed down the collection, updated its colors, and added an exclusive sticker sheet that is bursting with images, titles, and accents for a variety of crafting projects. The Brushed paper packet and coordinating products are only available for a limited time, so order yours right away! Save 20% on the entire collection with the Brushed Bundle, which includes the Brushed paper packet + sticker sheet, the Brushed Coordinating Cardstock, and the two coordinating My Acrylix® stamp sets! Offer available through July 31, 2020, while supplies last. Shipping assessed on the retail value of all items.
Center Diamond Fold Brushed Birthday Card
Stands to be displayed.

Closed for mailing

Flat to illustrate the panels
Personal messages can be stamped/written on the back

There is clear shimmer that shows when the card moves
and reflects the light, though a challenge to photo really looks great up close.
So here's a Birthday Card with both.
The instructions were found on Pinterest.
Instructions from Colleen Vaux
This one is called the Diamond Center Fold.
Card stock: White daisy 12" x 4".
Score on the 12" side at 2" & 4"
Make a mark at 6". (instructions continued below)
Turn to the other end and repeat.
Triangle panels: Cut 3 squares at 2-1/2" (Black CS)
Cut 3 squares (optional) at 2-1/4"
(Brushed: small leafy lagoon PP)
Side panel matting: Cut 2 at 3-3/4" x 1-3/4 "(Black CS)
Pattern Paper side panels: Cut 2 at 3-1/2" x 1-1/2"
(Brushed large flowers PP)
Diamond matting panel: 2-3/4" x 2-3/4" (Black CS)
Diamond Pattern Paper: 2-5/8" x 2-5/8"
(Brushed: small leafy lagoon PP)
Extra white CS for stamping: 2-3/4 x 6.
- Taking a ruler and a scoring tool. Score a line from the top of the 2" score line to the bottom 6" mark (as shown in the scoring diagram below) so that it crosses over the 4" scoreline.
- Score a line from the bottom of the 2" score line up to the top 6" mark (as shown in the scoring diagram) so that it crosses over the 4" score line making an X on the 4" scoreline.
- Turn to the other end and repeat steps 1 & 2 on this end. This will give you a diamond in the middle of the card.
- Fold and burnish all the score lines.
- Taking one of the 2-1/2" Cut it on the diagonal, point to point. To form two triangles.
- Place these triangles into the triangle places on the card.
- Take the other two 2-1/2" squares and cut them on the diagonal, point to point, and then cut each triangle into two smaller triangles.
- Do the same with the 3 smaller patterned paper pieces if desired.

Thank you Colleen Vaux!!
Embellishments
- A Brushed sticker flower plus a sticker of leaves. On part of the leaves and the flower I used powder to remove the "sticky" from the ends of the leaves and put foam tape behind the flower "sticker".
- Vellum for Happy Birthday & the butterfly - black embossed both. stamps from the Brushed Bundle.
- Gold shimmer brush on the butterfly and clear shimmer brush on the side panel flowers and the center flower and leaves.
- Three gold sequins were used: for the center of each panel flower and for the vellum "Happy Birthday" tag.
- A gold glitter gem was added to the center of each gold sequin. three small gold glitter gems were added to the center flower.
- Gold thread was added as a bow on the flower
THREE previous projects I created
when Brushed pack first came out.


Now
"Hop" on over to
Michelle Loncar's blog
to see her work! Be sure to visit all the consultants on their blogs to get some great crafting ideas. Please leave a comment, we love your encouragement. This special is only available through July 31. To get any of the products you see, contact your CTMH consultant or click HERE.
Love ve your fun fold card! Thanks for the directions, too!
ReplyDeleteWOW...gorgeous 'diamond' fold Brushed card...thanks for sharing!
ReplyDeleteDiamond fold cards have always intimidated me enough that I've never tried one. Thanks for sharing such a beautiful card and instructions that I think even I can actually follow and finally try it out, lol. ❤
ReplyDeleteThanks, Jen... Go for it, you can do it!
DeleteThe shimmer detail on your card is amazing and it looks so intricate!
ReplyDeleteLove this diamond fold card - they are a lot of fun to create!
ReplyDeleteSo pretty & thank you for the instructions! I love your vellum pieces...I need to remember to emboss on vellum! Thanks for your inspiration! :)
ReplyDelete