About

Monday, December 30, 2019

Bring Back My Pack - Urban Blog Hop

Welcome to the CTMH 
Bring Back My Pack - Urban Blog Hop. 
Get ready for a blast from the past with the return of the Urban paper suite! This slimmed down and updated paper packet is sure to be a go-to with its unique vibe! Along with a brand-new sticker sheet and a coordinating cardstock pack, the Bring Back My Pack special also includes a new workshop kit, with materials you need for creating layouts and cards for every occasion. Save 25% on the Urban Workshop Kit that includes the Urban Flair stamp set! The Bring Back My Pack—Urban special is available only while supplies last, so be sure to get yours before they’re gone! Offer available December 1 through January 31. Shipping and handling based on full retail price of all items.   
 If you came here from Kathy Burrows' Blog you are on the right path!  The blog hop is a great big circle, so you can start here and work your way all around.  If you get lost along the way, you'll find the complete list of participating consultants on Melinda's Blog HERE.  This month we have 8 CTMH consultants sharing their creations using the CTMH Bring Back My Pack—Urban special with other great CTMH products on their blogs.  This is simple to do - just click on the link at the end of the post on each blog to move to the next one!   Here we go! 
Thursday, I'm going to have a Fun Fancy Folds Card Buffet, my first!  I will definitely be using Urban for at least one card.


Measurements for the Fun Fold Card,
French Vanilla -card base - cut @ 4-1/4 X 8-1/2 score @ 3"
Card base insert - cut @ 3 X 8 and score @ 4"
Urban patterned paper:
  •  center inside: sapphire print - 4" X 5-1/4 
  • closed top right:  "crackled" saffron - 2-3/4 X 4
  • closed top left: pewter tread print - 2-3/4 X 3-3/4 
  • inside open left and right: "crackled" saffron
  • Lt. 2-3/4 X 4" Rt. 3-3/4 X 2-3/4" 
embellished top with zipstrip, stamped gears topped with Sapphire shimmer brush, mink twine , most stamping was Sapphire - the gears started out with Pewter, then painted with Sapphire shimmer.

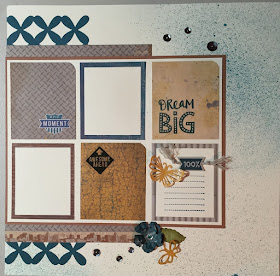
I really LOVE this paper!!  When it first came out, I made a layout using the November 1, 2015, SOTM "Cheers, 2016."

Now "Hop" on over to Cat Nowak's blog to see her work!  Be sure to visit all the consultants on their blogs to get some great crafting ideas. Please leave a comment, we love your encouragement. This special is only available through December 31. To get any of the products you see, contact your CTMH consultant or click HERE. 

Sunday, December 15, 2019

Season to Sparkle

Welcome to the CTMH Technique Blog Hop! 
This month there are 11 CTMH consultants using a variety of "Sparkle" Techniques along with other current CTMH products in their artwork.  This blog hop is a great big circle so you can start wherever you want and continue through to see all the fabulous artwork incorporating layering techniques.  If you are coming from Haley Dyer's Blog, you are on the right track!  If you get lost, you can find the list on the bottom of Melissa's blog.  Here we go!


I went with some red shimmer trim, gold foil paper, gold embellishing thread, and clear sparkles.  The sentiment is from the December SOTM.  
CTMH has LOTS of choices when it comes to accessories that Sparkle; shimmer trim (4), glitter paper (4) foil paper (2), glitter gems (3), shimmer brushes (9), clear sparkles, sequins (4) gold sequin ribbon,  gold and white ribbon, embossing powders (8), stickles (10), gold/silver thread.  Mathematically, there is an endless choice of possibilities to inspire me for a "Season to Sparkle" creative project. Here's a quick and simple card with lots of sparkle and bling. I cannot wait to see what others have done.  

Now hop on over to Miss. Carrie's Creations to see what kind of fabulous layering techniques she's created.  Be sure to drop a comment, we enjoy the encouragement. I hope you enjoyed this hop.  If you see items you would like to purchase, contact your CTMH consultant or you can Shop HERE

Sunday, December 1, 2019

December SOTM Blog Hop - Reindeer Crossing

    
WELCOME to the CTMH December 
SOTM Blog Hop featuring "Reindeer Crossing" 
a set of 10 stamps.  
It will be fun to see all the stamping inspiration found on this hop. 
If you came here from Lauren Moore's blog you are on the right path! The blog hop is a great big circle, so you can start here and work your way all around.  If you get lost along the way, you’ll find the complete list of participating consultants on Melinda’s Blog' found here.  
This month we have approximately 16 Close To My Heart Consultants sharing their creations using the December SOTM and other great CTMH products on their blogs.  This is simple to do - just click on the link at the end of the post on each blog to move to the next one!  
Here we go!


I had too many ideas for this card and decided on the shaker with the deer silhouettes adhered inside the shaker but in the foreground against the window so the sequins shake behind them. 
I used 4 out of the 10 stamps - evergreen and pine cone boughs stamped in evergreen and espresso - and fussy cut. 

 Now "Hop" on over to Kim Loewen' blog to see her inspiring work!   Be sure to visit all the consultants at their blog to get some great crafting ideas!  Please leave a comment, we love your encouragement.  Remember, the December SOTM is only available until December 31!  Contact your CTMH Consultant or (click here) to see how you can get this stamp set at a discount!

Monday, November 25, 2019

Best Friends Furever Blog Hop


Welcome to the CTMH "Best Friends Furever" Blog Hop. 
The Best Friends Furever Special was designed to document your favorite memories and moments with your pals with paws; easier than ever now, thanks to the Best Friends Furever special. Cat-lovers & dog-lovers alike will swoon over the Best Friends Furever Cut Above® kit, which features 6″ × 8″ pre-printed base pages with reversible die-cuts featuring dog-focused sentiments and images on one side and cat-focused ones on the other!

 If you came here from Haley Dyer's Blog you are on the right path!  The blog hop is a great big circle, so you can start here and work your way all around.  If you get lost along the way, you'll find the complete list of participating consultants on Melinda's Blog HERE.  This month we have 8 CTMH consultants sharing their creations using CTMH Best Friends Furever special with other great CTMH products on their blogs.  This is simple to do - just click on the link at the end of the post on each blog to move to the next one!   Here we go! 

I decided to use materials from the
Here are my two "grand-furbabies".  I will be using most of the cut above kit to make an album that will be a Christmas gift for them and their adopted Mom.

Close up - I used clear shimmer brush on the stars and popped them up with foam tape
I'm eager to get started on the album.  Collecting pictures will be the biggest challenge.  With the cut above kits, it's so quick to put an album together.
Now "Hop" on over to Miss. Carrie's Creations to see her work!  Be sure to visit all the consultants on their blogs to get some great crafting ideas. Please leave a comment, we love your encouragement. This special is only available through December 31. To get any of the products you see, contact your CTMH consultant or click HERE. 

Friday, November 15, 2019

CTMH Technique Hop - Paper-Layering

Welcome to the CTMH Technique Blog Hop! 
This month there are 10 CTMH consultants using a variety of "Layering Techniques" along with current CTMH products in their artwork.  This blog hop is a great big circle so you can start wherever you want and continue through to see all the fabulous artwork incorporating layering techniques.  If you are coming from Miss Carrie's Creations, you are on the right track!  If you get lost, you can find the list on the bottom of Melissa's blog.  Here we go!

When I think "layers" my first thought was a favorite from long ago - the layered card.  Here's my most recent creation.  I also added a cluster of layered flowers cut from our patterned paper (Cedar and Pine).  The layered flowers also look great on a blank background with a simple sentiment.  The tag with a layered frame is from the Cricut collection: Art Phylosophy available on your consultant's web site.  The stamped flowers are second generation with the overlay first generation - the stamps are from the November Stamp of the Month "Family Time."


Layered Card Instructions
Card Base, Candy Apple CS: 5 1/2 x 8 1/2, scored at 4 1/4
 White Daisy CS  layers: 5 1/4 x 4, 4 1/2 x 3 1/4, 3 1/2 x 2 1/4
Candy Apple CS: 4 3/4 x 3 1/2, 3 3/4 x 2 1/2

Now hop on over to Kim Loewen's blog to see what kind of fabulous layering techniques she's created.  Be sure to drop a comment, we enjoy the encouragement. I hope you enjoyed this hop.  If you see items you would like to purchase, contact your CTMH consultant or you can Shop HERE

Friday, November 1, 2019

November SOTM Blog Hop - Family Time


Welcome to the November CTMH SOTM Blog Hop 
featuring "Family Time " a set of 18 stamps.
 It will be fun to see all the stamping inspiration found 
on this hop. If you came here from Becca's's blog you are on the right path! The blog hop is a great big circle, so you can start here and work your way all around.  If you get lost along the way, you’ll find the complete list of participating consultants on Melinda’s Blog found here.  This month we have approximately 20 Close To My Heart Consultants sharing their creations using the November SOTM and other great CTMH products on their blogs.  This is simple to do - just click on the link at the end of the post on each blog to move to the next one!  
Here we go!


added some clear shimmer
Our double sided paper makes these box frames so easy.
Cut a 4 inch square, mark the center 
(no worries, it gets covered with an image.)
fold each corner to the center and then back again to the edge. I added some of the new Holiday Loose sequins and clear shimmer brush on the petals of the flowers.  It's hard to see in a photo, though a really special touch.  The flower was stamped in second generation candy apple, trim on the flower first generation candy apple.  The leaves in the box are both 1st and 2nd generation stamped in the new evergreen ink

 Now "Hop" on over Lauren's blog to see her inspiring work!   Be sure to visit all the consultants at their blog to get some great crafting ideas!  Please leave a comment, we love your encouragement.  Remember, the November SOTM is only available until November 30!  Contact your CTMH Consultant or (click here) to see how you can get this stamp set at a discount!

Friday, October 25, 2019

Holiday Cheer Blog Hop

Welcome to the CTMH "Holiday Cheer" Blog Hop. Spread holiday cheer with handmade gift tags and ornaments! Dress your Christmas tree and presents to the nines this year with beautiful, handcrafted ornaments and gift tags from the Holiday Cheer special! With a few fun bundle options—including various papers, complements, special digital art files, and exclusive stamp sets—you can customize your ornaments and gift tags to spread holiday cheer! As an added perk, we’re offering these kits at a 30% discount when you purchase them together! Don’t miss out on this opportunity to capture your favorite Christmas memories!version 
 So hear we go....

 If you came here from Becca's blog you are on the right path!  The blog hop is a great big circle, so you can start here and work your way all around.  If you get lost along the way, you'll find the complete list of participating consultants on Melinda's Blog HERE.  This month we have 12 CTMH consultants sharing their creations using the CTMH Holiday Cheer special with other great CTMH products on their blogs.  This is simple to do - just click on the link at the end of the post on each blog to move to the next one!   Here we go! 

It's tough to get a good photo with artificial light - waiting for the sunrise!
I decided to make a Birthday card for my grandson Owen who turned 19!!  I was hoping to find a baby photo for inside the snow globe, though did find a much younger Owen on FB and decided to use it!  I was also curious about the history of snow globes and found the following on Wikipedia"When exactly the first snow globes became well-known remains uncertain, but the popularity seemingly dates to the early 19th century in France. They may have appeared for glass blowers as adjuncts to paperweight, which had become popular a few years earlier. Snow globes were exhibited at the Paris Universal Expo of 1878, and by 1879 at least five or more companies were producing and selling snow globes throughout Europe.
The best deal for this special is the 

Holiday Cheer Tag & Ornament Kit - click to view

The entire kit at $58.95; a savings of  $25.54.

Now "Hop" on over to Miss. Carrie's Creations' blog to see her work!  Be sure to visit all the consultants on their blogs to get some great crafting ideas Please leave a comment, we love your encouragement.  To get any of the products you see, contact your CTMH consultant or click HERE. 

Tuesday, October 15, 2019

CTMH Technique Blog Hop - "Back to the Basics!"

Welcome to the CTMH Technique Blog Hop! 
This month there are 14 CTMH consultants using a variety of "Basic Techniques" along with other current CTMH products in their artwork.  This blog hop is a great big circle so you can start wherever you want and continue through to see all the fabulous artwork incorporating basic techniques.  If you are coming from Miss. Carrie's Creations, you are on the right track!  I you get lost, you can find the list on the bottom of Melissa's blog.  Here we go!


Paper inking or distressing is the technique I decided to use. But in my rush after a long meeting today, I glued down the triangles prior to inking. I also like incorporating both sides of our papers in creating cards.  Last week I created a fun fold card for the Spooktakular special.  I'm using the same paper - great colors and creating a sunburst aka starburst card inking all edges with a sponge dauber.  The bottom trim strip is embossed with the "stitched circles" embossing folder, the sentiment is stamped on a thin cuts stitched circle, and the stamping is "tone-on-tone"  using the same color paper and matching ink.
Sunburst Instructions
Start off by cutting your double-sided designer paper into rectangles. 
You'll need 4 or 5 of them if you are making a card similar to mine. 
(My rectangles are each 1-1/4" x 4" or 1 - 1/4" x 5" .)
Cut the rectangles from left top to right bottom creating a triangle.
Now hop on over to Cat Nowak's blog to see what kind of fabulous basic techniques she's created.  Be sure to drop a comment, we enjoy the encouragement. I hope you enjoyed this hop.  If you see items you would like to purchase, contact your CTMH consultant or you can shop HERE.


Another card using the "spooktakular" papers (inking only the edges of the thin cuts stitched oval and circle).  I used only the basic patterns that could be an "anytime" card. See how the card stands HERE.  This card also uses the Oct. SOTM.


Spooktacular is only available through October 31.

Thursday, October 10, 2019

Spooktacular Blog Hop

Welcome to the CTMH "Spooktacular" Blog Hop. 
The Spooktacular Special was designed to celebrate Halloween in style with exclusive paper and stamps that are truly Spooktacular! So hear we go....
 If you came here from Lauren Moore's Blog you are on the right path!  The blog hop is a great big circle, so you can start here and work your way all around.  If you get lost along the way, you'll find the complete list of participating consultants on Melinda's Blog HERE.  This month we have 7 CTMH consultants sharing their creations using CTMH Spooktacular special with other great CTMH products on their blogs.  This is simple to do - just click on the link at the end of the post on each blog to move to the next one!   Here we go! 
For my take on the Spooktacular paper, I chose a special fold, stand-up card that could display different paper cuts.  I needed a super, super fast and easy card.
Check out your shopping options! HERE.


Fun Fold Card

 closed to mail
standing
Featured colors: Black, Green Apple, Lemonade, Nectarine, Pebble, Thistle, and White Daisy. I used White Daisy card base and the Spooktacular patterned paper combinations.
  • Card Base: 8-1/2 x 5-1/2 – Score @ 2” & 3-1/8” on both sides
  • Patterned Paper: 5-1/4 x 1-3/4 (two pcs)
  •  White Daisy: 5-1/4 x 2  (2pcs - front and back) - if cardstock is dark and you want to stamp on it.  I used scraps and cut the stitch circle and oval for stamping - the second back piece is where you can write a message.  The card stands up really well.

Now "Hop" on over to Janet Royer's blog to see her work!  Be sure to visit all the consultants on their blogs to get some great crafting ideas. Please leave a comment, we love your encouragement. This special is only available through October 31. To get any of the products you see, contact your CTMH consultant or click HERE.